
 Manufacturing
 Learn more about our services
 Learn more about our process
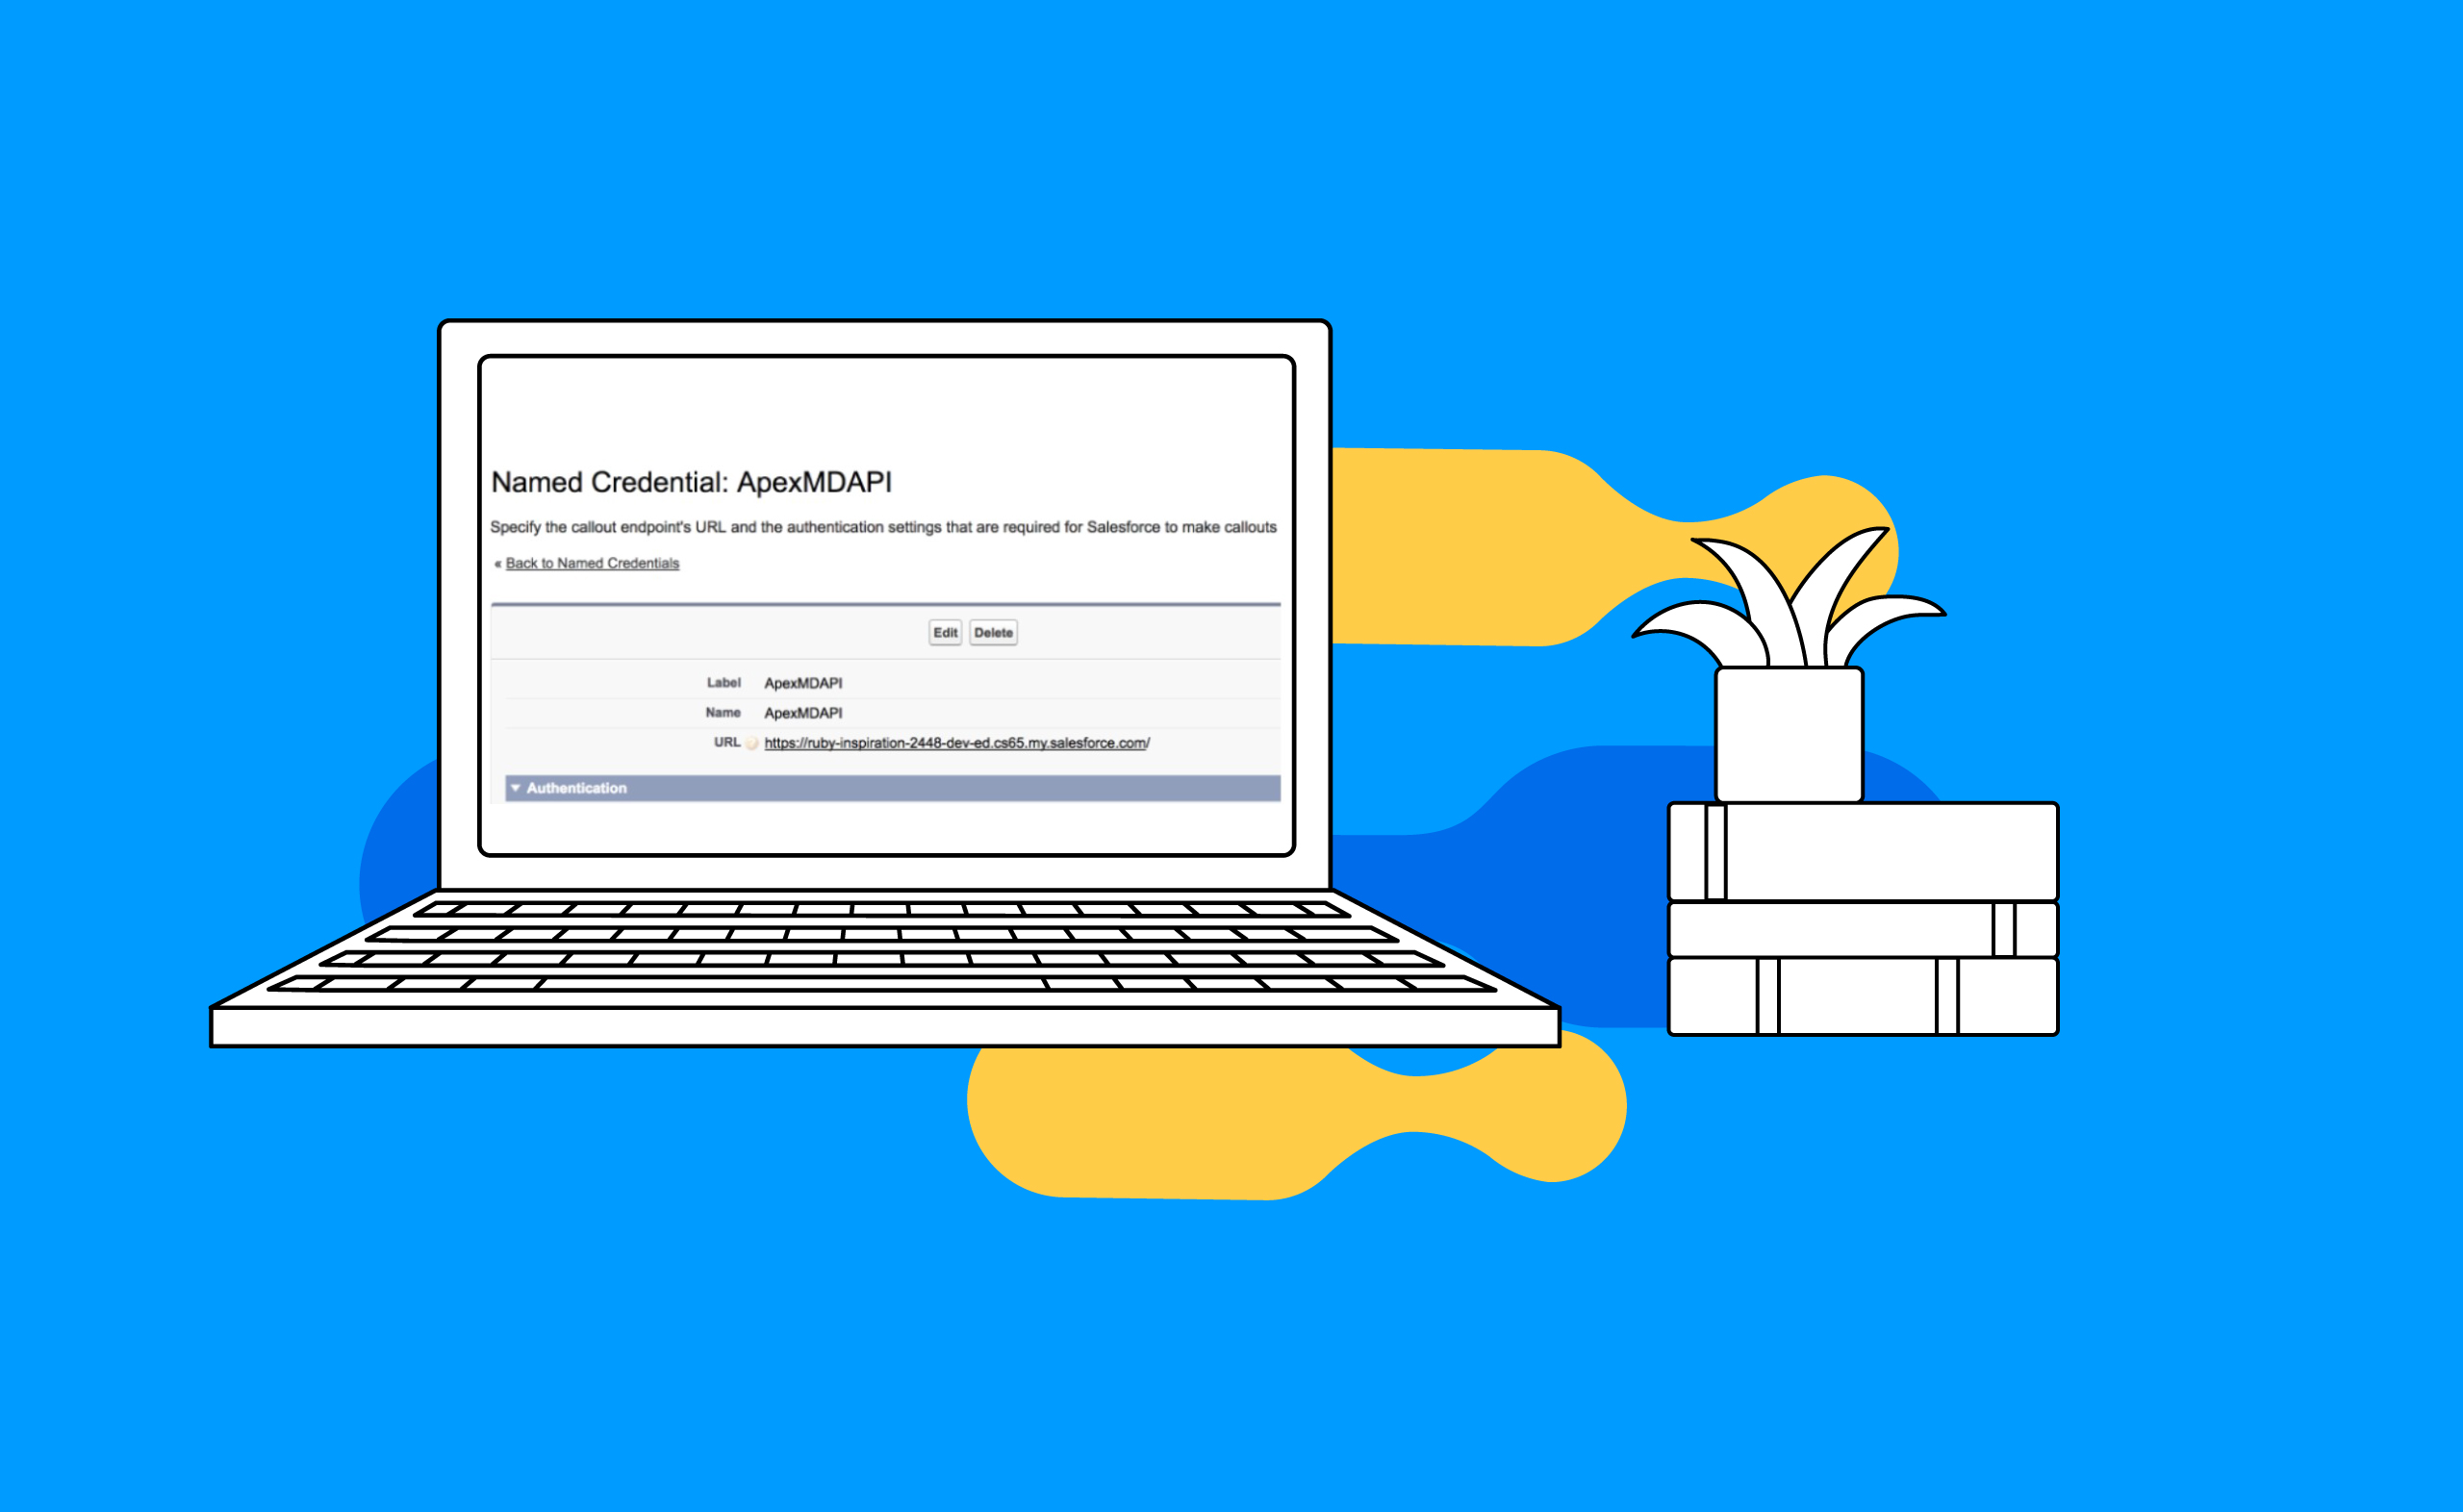
The Apex Metadata wrapper released by Andrew Fawcett @ FinancialForce brings the power of the Salesforce Metadata API to power users and lets developers manipulate Salesforce metadata using a familiar and on-platform language.
One often-asked question is how to use this API from within batch jobs or other scenarios where a first-class session ID is not available. Traditionally the solution has been to authenticate using the login() SOAP API method or implement an OAuth flow manually in Apex, which requires storing passwords either hardcoded in Apex (a very Bad Idea™), in Custom Settings (a less Bad Idea™) or other potentially “less secure” locations.
Beginning in the Summer of ’17, Salesforce announced official support for retrieving and manipulating metadata from Apex, albeit with some limited functionality at this current time and support for a wider range of metadata types coming in the future.
What if you can’t wait, and want this functionality now? Read on to learn how to leverage Named Credentials to securely authenticate with the metadata API.
Note: The following instructions assume an intermediate level of Salesforce technical knowledge. In this post, I do not go into too much detail on the mechanics of how this all works, but if you are interested, here is some further background reading: this and this.
Step 1: Creating a Connected App
To begin, we will create a Connected App. In Setup, navigate to Create > Apps and click the “New” button in the Connected Apps related list.
Give your app a name; specify a placeholder Callback URL (we’ll update this later), and ensure you choose the “full” and “refresh_token, offline_access” OAuth Scopes. The latter is important to allow Named Credentials to refresh your access_token when the session expires.

After saving the connected app, make a note of the Consumer Key and Consumer Secret that is generated. We’ll need these shortly.

Step 2: Creating an Auth Provider
Next, we create an Auth. Provider. The authentication provider is utilized to facilitate the authentication with your Salesforce org.
In Setup, navigate to Security Controls > Auth. Providers and click the “New” button in the related list.
- Give your Auth. Provider a name, and paste in the Consumer Key and Consumer Secret from your Connected App.
- Enter the scopes as specified before: full refresh_token offline_access
- Leave all other fields blank as per the screenshot above and save.

Next, we need to update our Connected App with the correct Callback URL.

Copy and paste the Callback URL, edit the Connected App we created earlier, and paste it into the Callback URL under the OAuth section.

Save the Connected App. At this point, you may need to wait a few minutes to allow the settings to take effect and propagate throughout Salesforce’s infrastructure.
Step 3: Creating a Named Credential
Next, we will create our Named Credential.
- In Setup, navigate to Security Controls > Named Credentials.

- Give your Named Credential an appropriate name – we’ll need to use this later when modifying Apex code.
- Enter your org’s instance URL – this will be the URL for your instance (e.g. na1.salesforce.com), or if you are using My Domain, your fully qualified My Domain domain (e.g. mycompany.my.salesforce.com)
- Under Identity Type, choose Named Principal. This assumes you will have one user (e.g. a “System User”) that will be executing all of the Metadata API interactions. Change this if your situation is different.
- Choose OAuth 2.0 for Authentication Protocol.
- Choose the Auth Provider you created earlier for Authentication Provider.
- In the “Scope” field, specify full refresh_token offline_access.
- Make sure you tick the “Allow Merge Fields in HTTP Body” checkbox. We rely on these merge fields to call the Metadata API as the authentication details are part of the HTTP body and not in the standard HTTP Authorization header.
- Tick “Start Authentication Flow on Save” and select Save.
You will be prompted to log in to your org. After you log in, you will see the connected app authorization screen similar to the following:

Allow access to this app (your app). Once complete, you should be redirected back to the Named Credential screen and see that the status is now set to “Authenticated as….”

Step 4: Modifying MetadataService.MetadataPort and createService()
We now need to modify the MetadataService.MetadataPort Apex class to use our Named Credential.
Locate and modify the endpoint_x variable to now reference our Named Credential:
public class MetadataPort {
        // Update endpoint_x to the name of your Named Credential
        public String endpoint_x = 'callout:ApexMDAPI/services/Soap/m/38.0';
Now, we can modify our createService() method provided in the MetadataServiceExample class to utilize the named credential’s OAuthToken merge field. You don’t have to put it here, however, it’s convenient to follow the conventions provided in the sample code.
// Modify createService() to use the Named Credential merge field

   public static MetadataService.MetadataPort createService()
    {
        MetadataService.MetadataPort service = new MetadataService.MetadataPort();
        service.SessionHeader = new MetadataService.SessionHeader_element();
        // service.SessionHeader.sessionId = UserInfo.getSessionId();
        service.SessionHeader.sessionId = '{!$Credential.OAuthToken}';

        return service;
    }
Save, and test it out. All going well, everything should work.
What if you don’t want to modify the MetadataService class? You can also set the endpoint_x variable when you create the service:
        MetadataService.MetadataPort service = new MetadataService.MetadataPort();
        service.endpoint_x = 'callout:ApexMDAPI/services/Soap/m/38.0';
        service.SessionHeader = new MetadataService.SessionHeader_element();
        // service.SessionHeader.sessionId = UserInfo.getSessionId();
        service.SessionHeader.sessionId = '{!$Credential.OAuthToken}';

        return service;
    }
This seems too good to be true right? WAIT! There are some quirks with the Metadata API that can cause unexpected problems.
Step 5: Avoiding Session Timeout Errors
We spent many hours banging our heads against a wall wondering why we’d start getting session timeouts after a while. It turns out there’s an issue with the way the Metadata API behaves that causes the token refresh process to not occur properly.
In a nutshell, everything seems to work fine after setup, but after a period of time (usually a number of hours), you get an error similar to:
Invalid Session ID found in SessionHeader: Illegal Session.
Session not found, missing session hash: xxxxx
This error usually occurs after a session expires or a user logs out.
faultcode=sf:INVALID_SESSION_ID faultactor=
But wait – didn’t we give our connected apps the offline_access and refresh_token scopes? Shouldn’t Named Credentials automatically refresh our access_token when it expires? What’s going on?
After discussions with Salesforce Support (and subsequently, product management), it turns out that this was an unexpected “bug” that is somewhat difficult to fix, so they have published this article for future reference.
The root cause is that, for historical reasons, the Metadata API is returning an HTTP 500 when the session expires, not a 401, so the Named Credentials infrastructure doesn’t know to try to do a token refresh; it can’t differentiate between a “500 because the session has expired”, and a “500 because something genuinely went wrong”.
We discovered that a workaround is to first make a call to one of the REST APIs (e.g. /limits) to cause the access token to be refreshed, then proceed with the Metadata API call afterward.
So what do I need to do?
Simple: Make a callout to the REST API that will correctly return a 401 error code when the session has expired, so Named Credentials will refresh the OAuth access_token that then gets merged into our Metadata API callout.
Add a block of code similar to the below just before you intend to do a Metadata API callout (you can modify the createService() method for example). We simply throw away the response, but this is enough to make sure the session is fresh.
Http h = new Http();
HttpRequest req = new HttpRequest();
req.setEndpoint(restUrl);
req.setMethod('GET');
HttpResponse res = h.send(req);

// Now do your Metadata Service calls here.
Note: Of course, this wastes an extra API call, so beware if you are making multiple Metadata API callouts to stay within the governor and other platform limits.
That’s it! Have fun, and as usual, with great power comes great responsibility. Keep a close eye on upcoming announcements on the Apex Metadata API; in time the official solution from Salesforce will hopefully allow 3rd party solutions such as the (awesome) apex-mdapi project to be retired.
Want to join a team of smart people working on solving difficult technical challenges like this? Check out our job postings here.